Mod Repositories
This page is intended for end users who may want to host their own Collab mods in the cloud. While it does not require any programming knowledge, it does require an understanding of the file serving solution you choose, such as AWS.
If you are interested in collaborating with the Envision Center to visualize your data for research, education, or industry, please contact us here.
About Mod Repositories
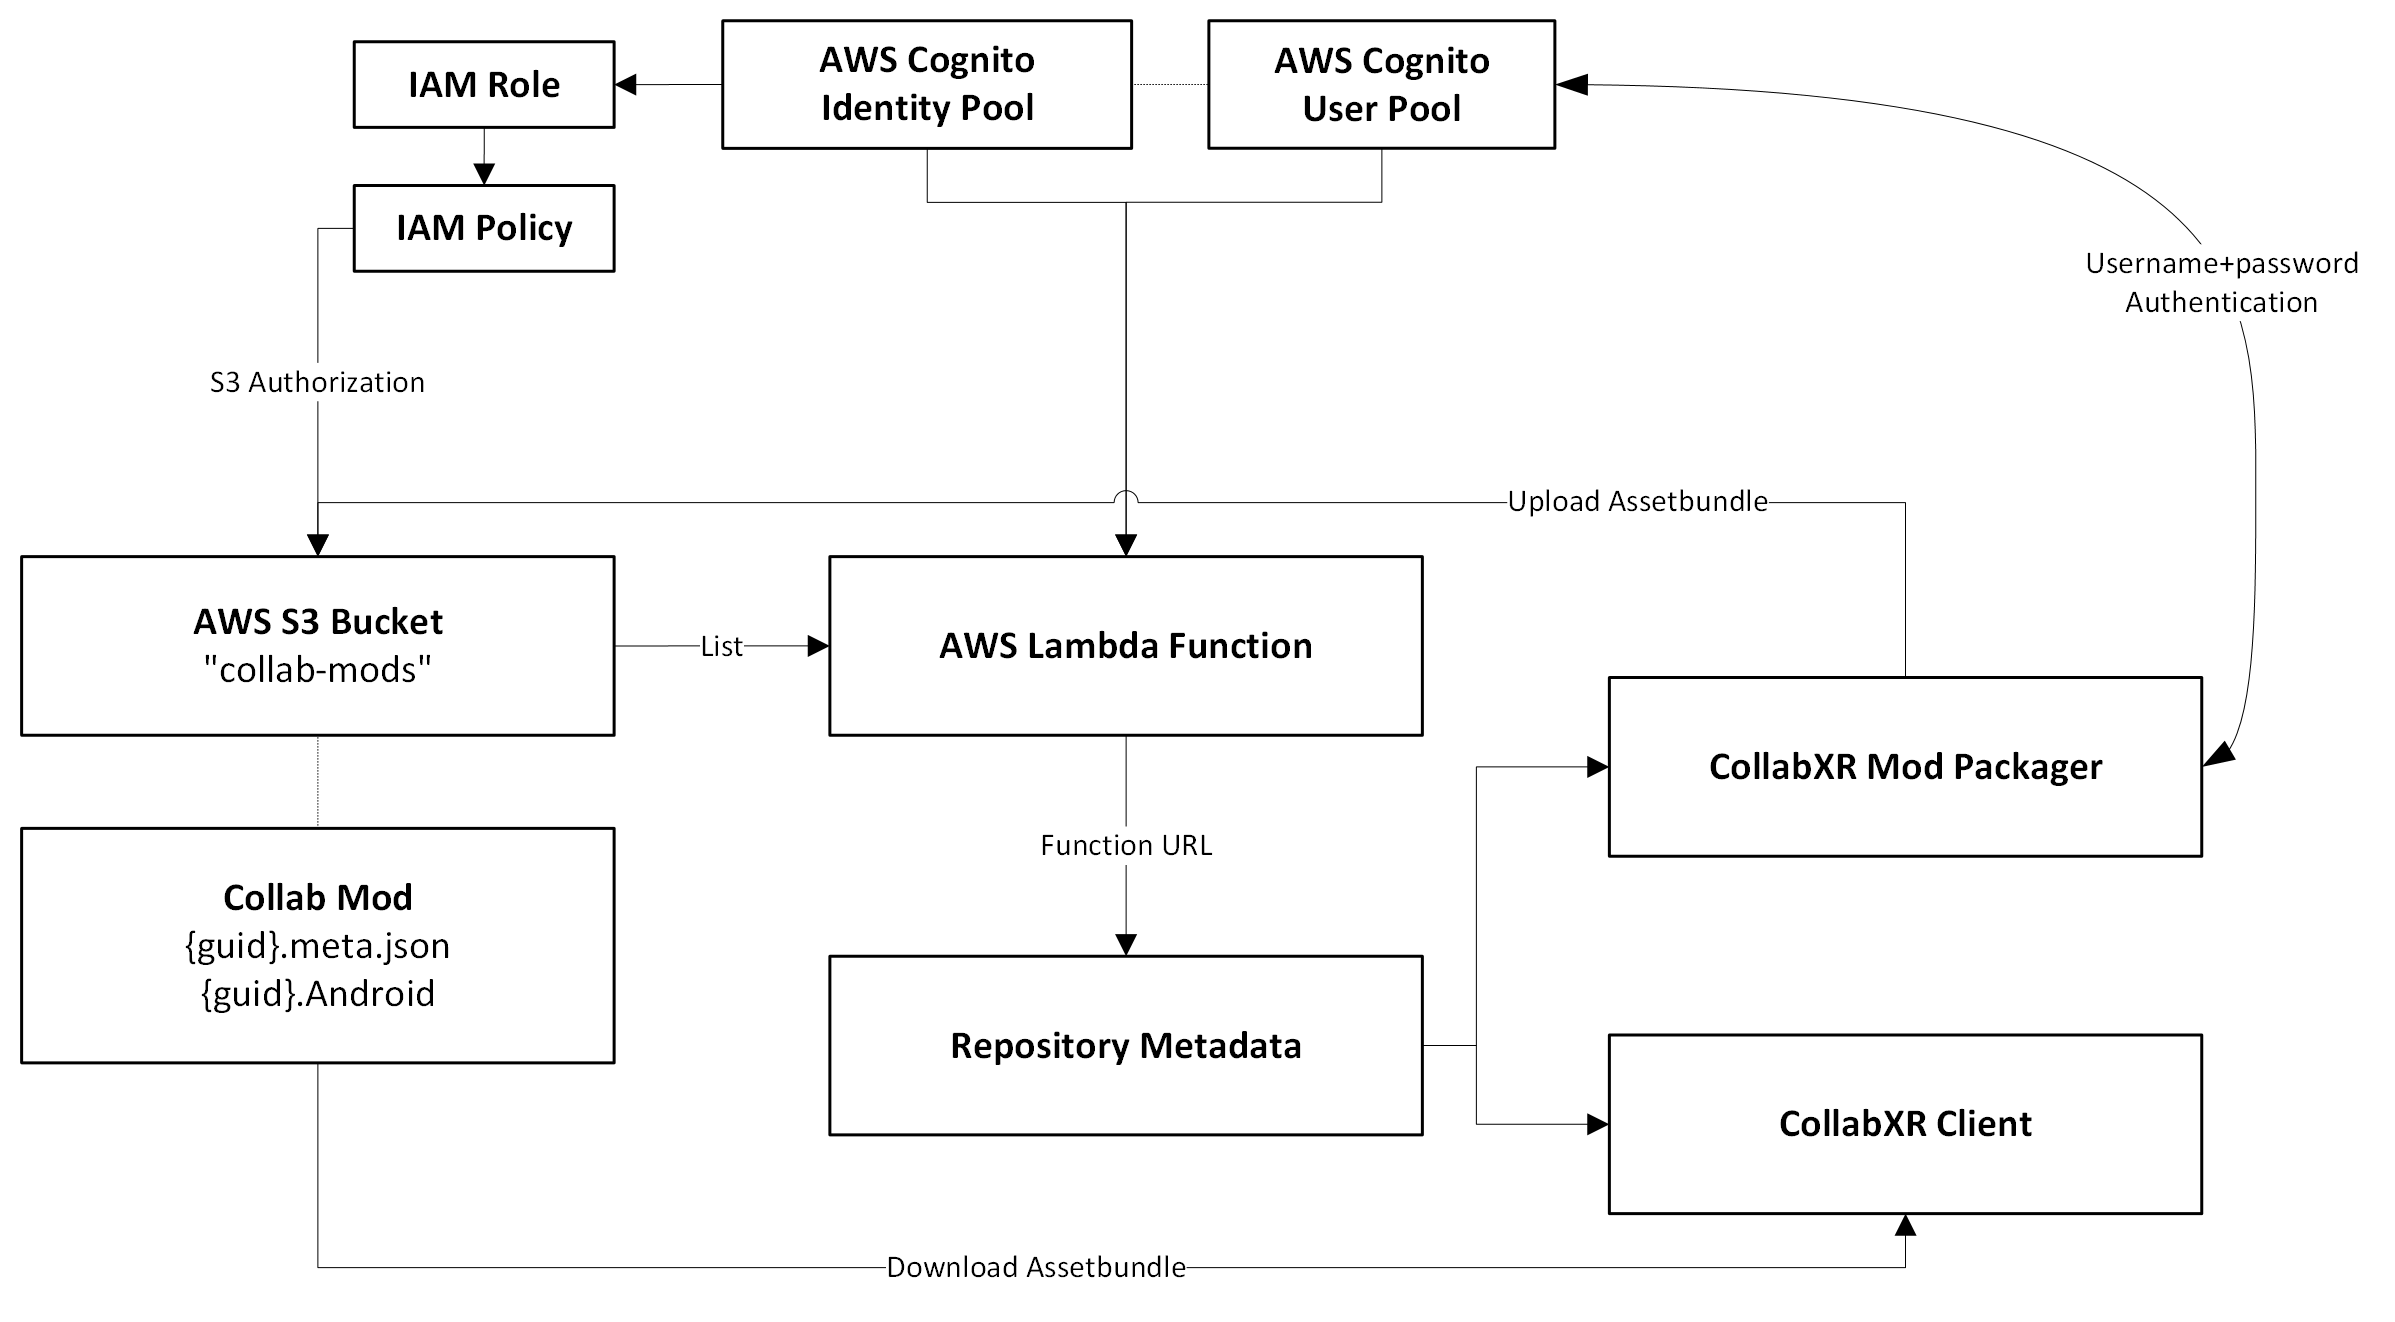
Mod repositories are the location in the cloud that CollabXR mod files are stored. In most cases, CollabXR expects a static, public file server containing Unity Assetbundles and their associated metadata in JSON format.
CollabXR was designed to be used with Amazon AWS for hosting mod repositories. It is recommended to use AWS S3 for filehosting, AWS Lambda to autogenerate repository listings, and AWS Cognito for upload authentication. However, it does support simple self-hosting.
Creating a Mod Repository with AWS
AWS S3 Configuration
In AWS, navigate to S3 and click Create bucket. This is where your mod Assetbundles will live. Enter a name and uncheck Block all public access. Check I acknowledge... and continue with the rest of the default settings.
Currently, CollabXR only supports public, unauthenticated file servers. In the future, basic AWS authentication may be supported.
AWS Cognito Configuration
This step is optional. It will allow the Mod Packager to automatically upload Assetbundles to your S3 bucket, otherwise you will have to manually upload.
In AWS, navigate to Cognito and you will see user pools and identity pools. Click Create user pool. Select Single-page application (SPA) and name the pool. Check Email and Username under sign-in identifiers. Uncheck Enable self-registration and choose email as a required attribute for sign-up.
Back in Cognito, navigate to Identity pools and click Create identity pool.
On step 1, check Authenticated access and then Amazon Cognito user pool. On step 2, enter a name for your new IAM role. On step 3, find your previously created user pool and select the first app client ID. On step 4, name your identity pool (can be the same as the user pool). On step 5, click Create identity pool.
AWS Lambda Configuration
In AWS, navigate to Lambda and click Create function. Enter a name, and the rest of the defaults should be fine (latest nodeJS runtime, with x86_64 architecture).
After creating the function, navigate to Configuration > Function URL and create a new URL. Choose Auth type NONE and click Save.
In the Code section, there should already be an index.mjs file. If not, create one. Replace any existing code with the following snippet:
import { ListObjectsV2Command, S3Client } from "@aws-sdk/client-s3";
const client = new S3Client({});

const baseRepoStruct = {
    StructVersion: 1,
    BaseURL: "https://my-bucket.s3.amazonaws.com/",
    RepoName: "My Mod Repository",
    RepoOwner: "My Name",

    S3BucketName: "my-bucket",

    CognitoURL: "cognito-idp.us-east-1.amazonaws.com/",
    CognitoUserPool: "enter-your-user-pool-id",
    CognitoClientID: "enter-your-user-pool-client-id",
    CognitoIdentityPool: "enter-your-identity-pool-id",
};

export const handler = async (event) => {
    try {
        const listResponse = await client
            .send(
                new ListObjectsV2Command({
                    Bucket: baseRepoStruct.S3BucketName,
                }),
            )
            .catch((e) => {
                return {
                    statusCode: 500,
                };
            });

        return {
            statusCode: 200,
            body: {
                ...baseRepoStruct,
                Mods: listResponse.Contents.filter((entry) =>
                    entry.Key.includes("meta"),
                ).map((entry) => entry.Key.split(".")[0]),
            },
        };
    } catch (e) {
        return {
            statusCode: 500,
            body: e.message,
        };
    }
};
In this snippet, make sure to input the information for your configuration, including the Cognito information if you are using it.
S3BucketName: your S3 bucket name. make sure to also replacemy-bucketin theBaseURLCognitoURL: the base URL of your Cognito user pool, in the format ofcognito-idp.REGION.amazonaws.com/CognitoUserPool: theUser pool IDfound in the overview of your Cognito user poolCognitoClientID: theClient IDfound in the app client page of your Cognito user poolCognitoIdentityPool: theIdentity pool IDfound in the overview of your Cognito identity pool
Your lambda function should now output a mod manifest upon navigating to the function URL, which lists all the mods in the repository.
AWS Policy Configuration
Your AWS pipeline will need 2 primary policies that must be attached to roles. Be sure to replace my-bucket with your S3 bucket name.
One will be only for reading and listing S3, attached to a role assumed by the Lambda function.
{
    "Version": "2012-10-17",
    "Statement": [
        {
            "Effect": "Allow",
            "Action": [
                "s3:Get*",
                "s3:List*",
                "s3:Describe*",
                "s3-object-lambda:Get*",
                "s3-object-lambda:List*"
            ],
            "Resource": [
                "arn:aws:s3:::my-bucket",
                "arn:aws:s3:::my-bucket/*"
            ]
        }
    ]
}
The other should be attached to a role used by the Cognito identity pool, for the CollabXR Mod Packager to upload and manage mods.
{
    "Version": "2012-10-17",
    "Statement": [
        {
            "Effect": "Allow",
            "Action": [
                "s3:Get*",
                "s3:List*",
                "s3:Describe*",
                "s3:Put*",
                "s3-object-lambda:Get*",
                "s3-object-lambda:List*"
            ],
            "Resource": [
                "arn:aws:s3:::my-bucket",
                "arn:aws:s3:::my-bucket/*",
            ]
        }
    ]
}
AWS Authentication
CollabXR supports simple IAM authentication in order to prevent S3 buckets being exposed to public access, so that users may host sensitive datasets. Please read this section carefully before continuing to ensure the security level meets your needs.
If you intend to restrict your S3 bucket, ensure that Block public access is enabled. A bucket policy will then be required to allow for reading. The principal role should be the one attached to the Lambda function.
{
    "Version": "2012-10-17",
    "Statement": [
        {
            "Effect": "Allow",
            "Principal": {
                "AWS": "arn:aws:iam::ACCOUNT_ID:role/service-role/my-role"
            },
            "Action": [
                "s3:Get*",
                "s3:List*"
            ],
            "Resource": [
                "arn:aws:s3:::my-bucket",
                "arn:aws:s3:::my-bucket/*"
            ]
        }
    ]
}
Create a new IAM user and navigate to Add permissions. Under Attach policies directly, attach the same policy that you used on the Lambda function. This will allow the application to read and list your S3 bucket.
In the IAM user, navigate to Security credentials and Create access key. For the use case, choose Other and give it a description. Copy the access key and secret key and store these securely. You will not be able to view the secret key again.
Please be aware that, since CollabXR is designed to be used by shared devices in an academic setting (i.e. many students and researchers sharing fleets of devices), there is currently no user identification to prevent others from loading your repository. Once you store the secret key on your device in the next section, it will be accessible to others using that device until you remove the repository from the list. While the keys are not stored in plaintext, they are not encrypted since they need to be accessible by anyone with physical access to the device. If this level of security is not sufficient for your use case, we encourage users to contact us or submit an issue further detailing your requirements.
Loading Your Repository
It is recommended to generate a QR code for your repository URL for quickly loading in headset. If your repository is authenticated, CollabXR expects the following format:
https://my-lambda-function-url.lambda-url.my-region.on.aws?access=MY_ACCESS_KEY&secret=MY_SECRET_KEY
In the CollabXR application, before connecting to a room, navigate to Settings and then Mods. Next to the input field, select the scanning icon and scan your QR code (or input the URL manually) and click Add repository. The application will automatically populate the object list with any assets found in this repository.
Adding AWS Mod Upload Accounts
Here is where you will add your own user, and any other users you wish to allow authorization to upload mods to your S3 bucket.
In AWS, navigate to Cognito > User pools and select your pool. Under Users click Create user.
Check Email under Alias attributes and set the user’s username and email. Set a temporary password, and log into the CollabXR Mod Packager in Unity with these credentials. It will prompt you to reset your password.
Self-Hosting a Mod Repository
Alternatively, you can host your own file server containing the mods and a manifest file.
The manifest file can be automatically generated, or built by hand. It requires some information to define your repository.
StructVersion- Defines the schema version to use for processing.BaseURL- URL to use when fetching mods. All AssetBundles and associated metadata should be placed top-level at this location.RepoName- Displayed name of the mod repository.RepoOwner- Displayed name of the owner of the mod repository.Mods- An array of mod UUIDs that can be accessed on the server.
{
    "StructVersion": 1,
    "BaseURL": "https://localhost/",
    "RepoName": "My Mod Repository",
    "RepoOwner": "My Name",
    "Mods": [
        "0098c7d1-5a49-46ae-ac4a-e8aa3b31e1a6",
        "02b732be-abba-421d-95ca-98386b62e81b",
        "0521edd6-9e84-48cf-9637-2349653ed00b"
    ]
}
Currently, there is no support for managing and uploading to a self-hosted repository via the CollabXR Mod Packager, rather you will have to build the AssetBundles offline and upload them yourself, however if you only have a few datasets this may not be a problem.
There is also no authentication system for non-AWS repositories, but you can maintain a private repository by keeping the file-server only accessible on your local network.
We are open to extending support for non-AWS workflows, so consider contributing.