Developer Setup
Consistent, clean, and readable code is important when making contributions in order to reduce friction between developers. While not required, installing these tools and adhering to code style guidelines is strongly recommended for a streamlined PR review process.
Recommended setup order:
Git LFS
Ensure Git LFS is installed in order to pull binary assets.
After installing, run these commands in the root of your repository:
$ git lfs install$ git lfs pull
DotNet
We recommended .NET SDK version 10, but anything support by .NET Standard 2.1 should be okay, although some tools like CSharpier may not work with older SDK versions.
Ensure the proper dotnet version is installed:
$ dotnet --versionIn the root directory of the CollabXR repository, install the dotnet tool manifest:
$ dotnet tool restoreInstall corresponding plugins for your IDE as necessary (CSharpier plugin list)
Most IDEs support “format on save” operations, see IDE specific setup.
If not automatically handled by your IDE, you can format using CSharpier at any time: $ dotnet csharpier .
Pre-Commit Hooks
pre-commit is used for formatting fixes and validation before making commits and pushing them. Their documentation provides a recommended installation method.
Note
If you’re working on Debian, pre-commit can be installed globally via apt: $ sudo apt install pre-commit
Once pre-commit is installed on your system, you can set it up within the root directory of the CollabXR repository: $ pre-commit install
Now, any time you make a commit, pre-commit should fix any formatting or whitespace issues before the commit is made. If any issues arise, pre-commit will abort the commit, allowing you to add changes before committing again.
Note
If you’re using GitHub Desktop, you may need to use the beta version for proper commit hooks support (if it works). Or, we recommend using an alternative GUI client like GitKraken (free version).
Playtesting
Testing in Editor with the Simulator
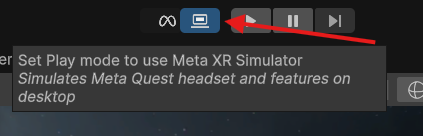
To simulate a Quest environment, we use the Meta XR Simulator, which must be downloaded from their site. We typically use the QuestDebug Build Profile for testing both in-editor and outside of the editor, since it is the primary platform we develop for.
Once everything is installed, launch the Meta XR Simulator and re-open the Unity project. You should see a MetaXR simulator icon near the Play button. Click it so it turns blue.
Open the Assets/Scenes/Menu.unity scene, and then press Play.
This should drop you in the main menu for CollabXR.
After connecting to a lobby, you can press B to open the spawn menu and tool selector.
You may need to disable one of the simulated controllers using the Open Inputs > Global Input Settings in order to open or interact with menus.
Testing in Editor with Meta Horizon Link
If the feature being tested does not require a true Quest environment (for example, it does not depend on mixed reality features such as depth or passthrough) the Meta Horizon Link app may be used in place of the simulator. Download and install this from their site.
In the Meta Horizon Link desktop app, go to Settings > General and scroll to the bottom. Next to OpenXR runtime click Set Meta Horizon Link as active. Allow any following prompts.
Ensure your Quest headset is connected with a USB 3.0 compatible port and cable. In the headset, enter Link mode from the Quick settings panel. Then, launch your app in Unity and your app should display in headset.
Testing in Headset
Build an APK using the QuestDebug Build Profile. You may need to install the Meta Quest Developer Hub to load the build onto a Quest headset.